Tuesday, September 28, 2010

Quick Quotes - Club Q re-design (Sept)

Here are the projects that I created using the Quick Quotes "Club Q" monthly kit club for September.

"Friends" (single page layout)

I created this layout in anticipation of the Quick Quotes Private Reserve getaway in Palm Springs the first weekend in October. I am attending the event with 3 of my girlfriends. The large flower will be for a picture of our table, then I can fit a single photo of each of us inside the smaller flowers :)


"Butchart Gardens"


"All About Me"


LAUGH (Rules of Chocolate)


LAUGH (Pg 1)


LAUGH (Pg 2)


TEACHER CARD

Wednesday, September 1, 2010

Quick Quotes - Aug Club Q Re-design


It has been a while since I've posted. We were out of the country for a few weeks, then school started back up. I've finally had a chance to sit down and scrap a bit and boy did it feel good :)

Here you will see a few of the designs I've created using the Quick Quotes Scrapbooking Company kit of the month for August. I have taken their products and added just a few of my own items I already had at home to put my personal touch on them.

Included is a single page layout of my son's first day of preschool. I got the idea to create a large apple from a magazine, then changed up their layout to be my own. I drew one side of the apple 'free-hand', then traced it onto a second piece of paper so both sides would match. Beneath that layout are two double page layouts of different parts of our Canada vacation. At the bottom is an altered chipboard mini album, very simply made since it's for my son. It will give him a few snapshots from this stage in his life "Me", "My house", "My family", "My teacher", etc.

Monday, July 12, 2010

'Splendor' Cards

SCRAPPIN at Ronda's
One of my favorite parts of scrap night during the first week of each month at Ronda's house is picking up my order from the previous month. It's like getting a new present each time I go out scrapping.

Last month part of my order included this "Splendor" paper pack from Close to my Heart. It is very whimsical with the clouds and flowers. I created two cards with it so far including an anytime card and a b-day card. I am also half way done with a two-page layout which I will post once it's finished.


On both cards I included a piece of embossed card stock that I created with my cuttlebug embossing folders. I like to sand them to make the words/pattern show through a bit better. Also on card #1 I first stamped the flowers in a white ink, then chalked over them lightly so each flower could be a different color.

Tuesday, June 29, 2010

June Club Q: re-design

I have been fortunate enough to be one of 4 lucky ladies chosen to re-design the monthly kits sent out by Quick Quotes. Each month Quick Quotes sends out page kits and/or a canvas kit. We've been charged with taking these same products that are sent out and doing entirely different projects with them.

I hope you enjoy my creations with their 'Paint It Black' papers. :)

I have included two single page layouts, one double page layout, a card (with a canvas front) and an altered frame. Feel free to click on any image and it will enlarge the size to see the details a bit better.

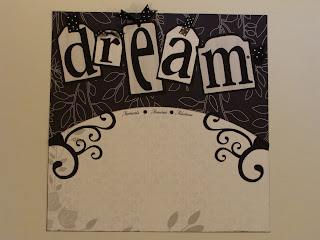
For this first layout I used the die cut 'dream' and cut each letter apart to create individual tags. I also cut some of the die cut flourish apart to use it as separate pieces.


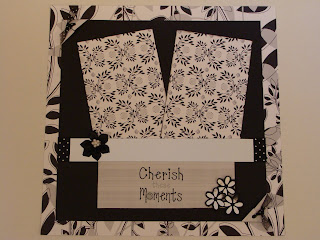
For my second layout I decided to take the die cut flower border and cut it into three pieces. Two of the pieces you will see along the edges of this page. The center row of flowers I cut into individual flowers to help embellish some of my other pages.


For this double page layout, on page 2, I created 3 pockets which will allow for multiple photos to slide in and out. I used ribbon or a scallop to top off each pocket and added rub-ons in the bottom corner.


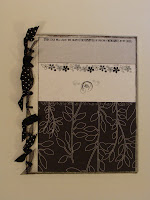
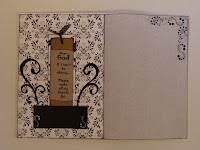
With the canvas I created a large card. I used my crop-a-dile to punch holes down the left side and tied the binding together with ribbon. On the inside I created a small pocket with a bookmark for the recipient to use. I 'love' the vellum quote on the bookmark - it makes me laugh.


With my remaining pieces of paper I created an altered frame. I found this wooden frame at Michael's for $1. What a bargain! :)

Monday, June 28, 2010

"Play" - Made in minutes


I absolutely love that many companies are now creating entire 12x12 pieces of paper that are diecut for you. It adds extra dimension and pop to any page. For this layout I used Crate Paper's 'Seasons' line and just added a few chipboard embellishments. Cute layouts don't always have to take hours.

This is Nolan's new playhouse. It was an early gift from Great Grammie for his 3rd birthday.

Sunday, June 13, 2010

New addition to my scrap room


So I am officially out of photos to scrap. I have scrapped every event up through last weekend - sickening I know. In the meantime I decided to try to find a way to display some of my art in my office. About a week ago, Jess and I went out scrapbooking and stopped at a scrap store in Yorba Linda that was going out of business. They were selling display racks, slatwall, gridwall, etc. It was the perfect opportunity to add to my room.

I purchased three 1'x5' gridwall panels and lots of hooks. (total under $20) Now I am able to display some of my recent work and easily change it out with new stuff. I am super thrilled about the new addition. (Big thanks to my hubby for being patient during the hanging up process - lol.)

Check out these pics and let me know what you think!

PS - the lamp in the pic below is what inspired my whole room :)

Saturday, May 29, 2010

"Laugh Often" 16x20 canvas


I hope everyone is having a fabulous Memorial Day weekend. I was able to spend this morning scrapping with my best friend, Jess. Here is the canvas I created today. I don't have pictures for it yet but I was too excited to wait to post.

The paper line is from Crate Paper and is called 'Seasons.' I found the canvas at Michael's on sale, two for $5.99. Canvas comes in various sizes. This particular one is 16x20. Since scrap paper is only 12x12 you have to be a bit creative to cover up any seams.

I used my cricut machine to create my diecut words and large frame on the left. I made the bottom portion a pocket so my tags could stick out of it. To make a pocket simply glue on the left side, right side and bottom only. This leaves the top open to slide items into it.

I wanted to add some dimension to the page so I took one row of flowers and punched out various size circles in coordinating paper. Then I trimmed all edges of each circle (so they wouldn't be perfect), sprayed them with water and crinkled them, then set them aside to dry. Once dry you can add a brad and glue them down. I also used pop up tape on 'Laugh Often'.

I will post an update picture of this project once I add my photos. :)


Wednesday, May 26, 2010

'Dream' Layout


Lately I am loving black and white photos. No matter what paper choice or colors you use, a black and white photo always works on the page. For this simple layout I used one sheet of background and texture paper, then cut a scallop at the bottom of a mesh piece and added it on top.

Flower: I created the flower in the upper right corner by punching 2 circles of various sizes. Take a spray bottle and get each side slightly wet. Fold in all edges and allow to dry. Once dry, add a brad and glue to your page. This is an easy (and inexpensive) way to add a three dimensional element to any page.

Ribbon: I took ordinary black ribbon and using glue dots I turned it into a more interesting embellishment. I simply kept folding the ribbon back on itself and adhered each piece with a mini glue dot.

Even though the page is virtually colorless I find it very appealing and want to work more with gray-scale papers.


My Scrap Room

Welcome to Lisa's scrap store (oops - I mean scrap room). My friends always say that you don't know how serious I am about my hobby until you step foot in my room. I thought it was time to give some of you a peek into my work space.

I found a zebra lamp with pink trim at Bombay Kids and from there this room was born.

Tour of my room:
3 paper stands
Clip it up for embellishments
Oversized work table
Lots of storage compartments
Paper towel holder & regular towel bar to hold ribbon
Dollar tree crates to hold my acrylic stamps
Stamp pad organizer
*I have a very handy, wood working dad who built one of my paper stands, my desk, and my stamp pad holder. I am a lucky girl! =)

Next on my list: a slatwall panel where I can showcase some of my favorite projects.